
Search history
Clear allSearch by image
XDrag and drop an image here or upload an image
Max 5MB per image
UploadSign In | Join
Search history
Clear allSearch by image
XDrag and drop an image here or upload an image
Max 5MB per image
UploadSign In | Join
X Email Mobile
Hailan Electrical Appliance Firm 14yr.
Contacts zhouaibiao Chat
Mobile 86-13735758480
E-mail 1040472497@qq.com
WeChat 13735758480
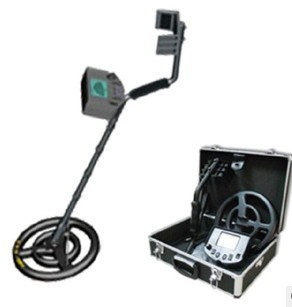

Product Packaging List:
1、 Detector Host
2、 Host Backpack
3、 Waterproof probe
4、 Detector linkage set (3This is a set of items.
5、 Charger
6、 Headphones (Optional Accessory)
7、 Product User Manual
Product Technical Parameters:
1、 Detection depth: 1.5-3.5m
2、 Signal Frequency:9.6KHz
3、 Sound Frequency:400Hz
4、 Working Voltage: DC12V(Built-in rechargeable battery)
5、 Power Consumption: 0.8W
6、 Connecting rod length:1.3m
7、 Net Weight: 2.4KG
8、 Gross weight:6.8KG
9、 Packing Size: 62*39*18CMAluminum Box Packaging
Professional Metal Detector
Operating Manual
Model: Falcon
Equipment Maintenance and Maintenance:
The Falcon Metal Detector is a well-designed and meticulously crafted instrument. The following suggestions will help you maintain this product to extend its service life.
Operate the detector with caution and care. A fall may damage the circuit board and casing, and could result in the detector malfunctioning.
Use this instrument at normal ambient temperature. Extreme cold or heat can shorten the life of electronic devices and damage the detector's shell.
Stay away from dust and dirt, as they can corrode and damage the parts. Regularly wipe the detector with a cloth to maintain its clean and shiny appearance. Do not use harsh chemicals for cleaning.
"保"在中文中通常指的是保护、保证、保险等含义。在英文中,"保"可以翻译为 "protect"、"guarantee" 或 "insurance"。 "修"在中文中通常指的是修理、修复或学习、研究的意思。根据上下文的不同,它可能有不同的英文翻译。例如,"修理"可以翻译为 "repair","修复"可以翻译为 "restore",而"学习"或"研究"可以翻译为 "study"。如果您能提供具体的上下文,我可以给出更准确的翻译。
This product is exchangeable within one month from the date of purchase; for any quality issues attributed to the product itself, after confirmation by our company, we offer a one-year free warranty period. For any damage caused by improper operation or human error, we can provide free repairs, but materials fees will be charged accordingly. Please send your original purchase receipt when returning for repairs. This warranty does not apply to any faults or defects caused by accidents, improper use, improper maintenance, disassembly or modification by the user, or abuse of the machine. It also does not apply to machines that have been repaired by unauthorized personnel.
The area, sweep should be from one side to the other. Note: If you use precious metals such as gold for test items, remember to mark the location where you put them, so you can find them after the test. Do not put the items in the bushes or weeds.
Detection Tip:
Do not swing the probe like a pendulum. Lift the probe or it will lead to a mistake.
Detection reading. It's best to form a from one side to the other.15A centimeter-wide arc should be swept horizontally, ensuring that the probe remains parallel to the ground. The sweeping speed should be slow, as fast speeds may miss the target to be detected.
Exploration Plate Mobile Method Diagram
Correct Moving Method Incorrect Moving Method
Product Function and Features Introduction:
The Falcon is a high-performance metal detector. The detector's sensitivity and stability are at the highest level among domestic similar products. In addition to the aforementioned features, another most prominent feature of this product is its ability to identify the type of metal, allowing you to easily find metal items that are useful to you. This function is not available in other models of similar products in the domestic market. After owning this detector, you can engage in treasure hunting activities in more places, saving the cultural relics buried underground, searching for coins, jewelry, and gold and silver products. Note: This instrument is not to be used for illegal activities, and the consequences will be borne by oneself.
Product Main Features:
One, High-brightnessLEDThe indicator panel can display the strength of the signal when metal is detected, and roughly indicates the type of metal detected.
Two, In full metal detection mode, it is suitable for searching for metal items on the ground and can be simply identified with the metal identification function.
Three, exceptLEDThe panel display indicates that it can also distinguish metal categories by tone.
Fourth 9.5An inch-thick waterproof probe can be used for exploration in shallow water.
Five, Equipped with an external headphone jack, it can be connected to mono headphones (headphones are provided), which is simple and easy to use; it is equipped with a large capacity rechargeable lithium-ion battery, which has a low voltage indicator function, and is equipped with a charger. It can work continuously for more than 10 hours after being fully charged.
Product Structure Diagram:
图一
(1exploration well (2Butterfly-shaped knob (3probe linkage
(4Magic Clip (5link1 (6link2
(7)SLinkage rod8Arm Cup (9)V形夹
(10Signal line11Host box (12Host Control Board
LEDLamp Indicator Panel:
Indicator panel marked according to the American underground metal detector indicator standards. When the detector detects metal, the first row on the panelLEDThe lights will gradually turn on, and the signal will become stronger.LEDThe more lights that turn on, but in the recognition mode,LEDThe light indicates the detected metal category. The arrangement of metals on the panel is based on their conductivity and electrical conductivity. The better the metal conductivity, the larger the brightness area. Even for the same metal,LEDSignal strength will also vary. It is also affected by the shape, size, and depth of the metal.LEDThe total number of instructions is10One, from signal strength5%The lights start to turn on, and the signal strength increases by10%will drive aLEDThe light turns on.
Test Detector and Use Detector
To ensure that the detector is functioning normally and to understand how it reacts to different metals, you should test it before use.
1. Turn on the power switch and enter the working mode.
2. Find an area with no metal on the ground.
3. Place a sample of the metal you want to investigate on the ground (e.g., a coin, a key, or a small piece of metal)1A gold ring or a coin.
4. Adjust the sensitivity and threshold knob to the middle position.
Lower the probe to the ground.2-5Centimeters, slowly move the probe to sweep over the sample location.
Detection experience and common abnormal prompts
1If the detection area is disturbed, such as from other instruments, power cables, television or radio stations, lower the sensitivity, or change to another detection area.
2In high-mineralization areas, even if no metals are detected, the detector will emit an alarm sound. In this case, you can lower the sensitivity and threshold settings, and increase the distance between the probe and the ground until you stop hearing false alarms.
3In areas with complex soil composition, it is necessary to adjust the sensitivity knob and the threshold knob to the appropriate position. Do not adjust it too high, or there will be false alarms. When searching, stay away from all large pieces of metal and metal digging tools to avoid interference.
4In the full metal mode, if the sensitivity is set very high, the machine may have some changes. In this case, press the reset switch to eliminate the interference, reset the indicator lights to complete extinction, and then release the reset switch.
5In the recognition pattern, the detection of iron or steel targets,LEDThe indicator light does not indicate anything, but if the target is iron foil or alloy foil, the non-ferrous metal indicator light will turn on.
Product Installation Introduction
Open the packaging box, there are seven components: the main box, the detection disk, three combination extendable rods, the charger, and the headphones. Assembling this detector is very easy, no special tools are needed, just follow the following steps:
One, Remove the probe and the connecting rod1Twist out the connecting rod1Remove the knob connector at one end and insert the handle onto the connecting rod, aligning it with the small handle on the probe.1Then twist the knob to secure the rod and probe.
Two, Remove the connecting rod2andSType tube, hold the connecting rod1onVType clamp, connect the rod1One end of the rod is inserted into the hole.2"Hold down";SType tubeVType clamp, rod2The other end of the inserts intoSType tube, please ensure that the spring clasp is securely inserted into the latch of the rod.
Three, Stretch or shorten the pole vertically to the appropriate length: when relaxing the arm holding the detector, the probe should be at a distance from the ground equal to the paper.1-2Inch. Adjust the probe to be parallel with the ground by turning the butterfly-shaped knob on the tension probe pole. Wind the probe cable around the pole and secure it with Velcro, ensuring a certain amount of tension.
Fourth Insert the aviation plug at the end of the probe cable into the aviation socket inside the main box. Note: Please feel the position of the plug, and after hearing a click, twist it in. Do not apply force to avoid damage.
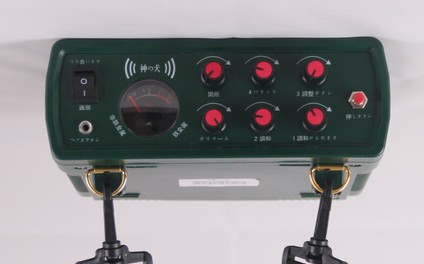
Host Box Function Introduction
1.Detection signal indication area
2. Earth Balance KnobGND BALFull Metal Mode: Press this button to activate.PArea is the balance area, in this area, users can find a balance point (please refer to the first8Page 13The operation was completed successfully.
3. Tuning KnobTUNEFull Metal Mode: Press the button to switch to the Full Metal Mode.GND BAL),按住复位开关,当您由左至右旋转旋钮到PWhen at a certain point, a faint sound will be heard from the speaker, which is called the critical point sound. The correct critical sound is beneficial to the detection performance.
4. Sensitivity Control KnobSENSITIVITYThe sensitivity adjustment knob is used to adjust the sensitivity level. Rotating the knob clockwise can increase the sensitivity, while rotating it counterclockwise can decrease the sensitivity. This knob is applicable for both the all-metal mode and the discrimination mode.
5. Identification KnobDISCBy adjusting this knob, the user can eliminate specific metal interference, meaning that when detecting the metal to be excluded, the device will not emit a sound alarm (using a tone to roughly distinguish the category of metal).
6. Threshold KnobTHRESHOLDThis knob is only used for identifying the mode. Counterclockwise rotation can reduce interference and slow down the response speed, while clockwise rotation will have the opposite effect.
7. Volume knobVolumeThis knob has two functions. The first is to turn on the power, and in the identification mode, it can also be used to adjust the volume. Rotate clockwise to increase the volume, and rotate counterclockwise to decrease the volume.
After finding the metal object, switch to the identification mode: pull the detection mode switch to the DISCIdentify pattern, adjust the identification button to0Threshold adjusted to12At the clock position, when the probe sweeps over the target above, the corresponding metal marker on the indicator board will light up. Additionally, you will hear a 'drip' sound.~"Drip" sound. When detecting different metals, the lights corresponding to the metal position on the indicator board will light up. Note: When detecting non-ferrous metals, there will be no indication on the indicator board. If a metal target is detected, the lights at the metal indication will light up. Some metal objects contain multiple metal elements, and the lights at these components will light up at the same time. In a dark environment, you can identify the detected metals by the different lights and sounds. At this time, you can set the detector to emit a "drip" sound when detecting the target precious metal.~Drip" sound, other metals do not make a sound. Recognition button0 to 10Degree, corresponding to the dial0 to 10个LEDSignal Strength of the Light. For example: 'Identification Button'4Degree corresponding is the first on the dashboard.4The indicator light location; adjust the identification button to4Degrees, on the dial40度以下(黄金下以)的金属被探测到时就不会发出声音;但40Metal above the degree will be detected and emit a "du".~The sound of 'du'.
Please press the reset switch. Note: When searching in high-magnetite areas, set the sensitivity lower, and keep the probe higher from the ground. When using normally, keep the probe at a distance of2-5Centimeters, slowly sweep horizontally.
5Interference and reset operation: If the detector detects any metal object, you will hear a clear and crisp alarm sound.LEDThe signal indicator lights up accordingly; the stronger the signal, the more lights that will turn on. If you hear a sound different from the alarm, or if there are any abnormalities in the machine's alarm during the detection process, please press the reset switch, and you will hear the same sound as when adjusting the critical point and the ground balance. If the alarm sound is abnormal, and the above operation does not achieve the desired effect, please turn off the power and re-operate once.
II. Pattern Recognition
Metal Type Indicator Panel Instructions:
After detecting the black metal, there are no indicators on the panel.DISCIndicator strip for non-ferrous metals category, which includes gold, gold and silver mixtures,25美分、银1The dollar has several types of metal, and sometimes when multiple indicators light up on the display board, it indicates that the metal element content of the target object is quite complex. It requires extensive use and accumulated detection experience before one can accurately judge which type of metal the target object is roughly made of.
The indicator panel is shown as follows.
The knob is only suitable for identifying the pattern.
8. Low Voltage IndicatorLOW BATTBattery Voltage Below10VWhen the battery is low, the low voltage indicator will light up, and at this time, the user needs to charge the battery in time.
9. Reset switch: Adjust the critical point and signal reset or press this switch when there is interference.
10. Work Mode Switch: GND BALFor the full metal mode,DISCFor metal identification mode
11. Headphone jackHeadphone Jack)。可插入3.5Millimeter mono earphone, at this time the built-in speaker will be disconnected.
12. Charging interface: Used to charge the built-in battery.
13. Signal Interface: Connect to the probe disk.5Core Aviation Head.
Headphone Usage Introduction
1. will3.5Insert the mm stereo headphone jack into the headphone jack on the main unit. At this time, the built-in speaker on the main unit will be disconnected.
2. Volume Knob (This feature is only available whenDISCThe pattern is effective, adjust to the appropriate position according to the environmental conditions.
3. SetDISC MODETo protect your hearing safety, before using headphones, set the volume to the lowest, and then gradually adjust the volume. Do not adjust the volume to too high, continuous listening to too high sound may cause permanent hearing loss. Pay attention to traffic safety, do not use headphones in areas with dense traffic.
Specific Operating Method Introduction
1. All-Metal Mode
1Select the all-metal detection mode: to detect precious metals, it is first to find that it belongs to metal, so the user should first use the all-metal detection working mode, the specific method is to turn on the working mode switch.(Figure 20")Switch toGND BALPattern.
2Critical Point Adjustment: Turn on the device and rotate the sensitivity knob to 12At the o'clock position. Lift the detector, ensuring that the probe is at least 1Turn the tuning knob in a clockwise direction while holding down the reset switch.TUNEGo to the red zone until the alarm from the speaker stops. The accuracy of the critical point adjustment will directly affect the sensitivity and stability of the detector. After adjusting the critical point, release the reset switch.
3Ground Balance Setting: Rotate the Ground Balance Knob to "PZone, set the probe distance to the ground2-5Centimeters, you will hear the same alarm sound as when adjusting the critical point. If the sound increases at this time, press the reset switch and adjust the balance knob counterclockwise to lower the sound; if the sound decreases, adjust the balance knob clockwise to increase the sound, until the sound size is basically unchanged when lifting and lowering the probe plate.
4Sensitivity Setting: Do not set the sensitivity too high when working normally. Usually, set the knob to "④".12Set the clock to the desired position, and adjust the sensitivity each time after.
Update time:


TOP


