
Search history
Clear allSearch by image
XDrag and drop an image here or upload an image
Max 5MB per image
UploadSign In | Join
Search history
Clear allSearch by image
XDrag and drop an image here or upload an image
Max 5MB per image
UploadSign In | Join
X Email Mobile
Hailan Electrical Appliance Firm 14yr.
Contacts zhouaibiao Chat
Mobile 86-13735758480
E-mail 1040472497@qq.com
WeChat 13735758480
The VR6000 is a compact and portable device used for locating gold, silver, and copper. It is a remote, deep-reaching locator. The latest and leading technology in the field of wireless detection is object reflection. The VR6000 precious metal detection system employs the Gauss theory of German scientists to achieve the goal of discovering precious metals by utilizing the oscillation frequencies of object atoms.
Traditional metal detectors work by swinging the arms, and the working area is very limited for one day. If they encounter harsh terrain such as overgrown weeds, they cannot work. Due to the different principles of operation, the detection depth of traditional metal detectors is very limited. In search of better metal detection methods, I have introduced advanced long-distance metal detection technology from abroad. After repeated research and testing, we have developed the VR long range locators series, a large-depth, long-distance metal detection system, which is also known as the treasure and precious metal directional indicator. Its features include ultra-deep detection, large-area rapid scanning, and the detection area in a few minutes is equivalent to the work of a traditional metal detector for a long time. The signal can penetrate mountains to detect six kinds of precious metals such as gold, silver, copper, lead, tin, and diamonds. The instrument uses a microprocessor-controlled central unit, including anomaly correction, non-drifting multi-path transmission, and a pre-programmed separator switch; the instrument can send and receive object signals within a wide range.The maximum detection range can reach 1500 meters, and the signal does not decrease after penetrating the mountain body for 45 meters; under ideal geological conditions, the detection depth of a single silver coin can reach several meters. The instrument is simple to operate and can be learned within one day without any cultural background. Please read the user manual carefully before use.
· Headphones
· Receiving rod (2 pieces): They are sealed copper columns, connected to wires with plugs at the bottom, which plug into the receiver. The other end of these copper columns extends with thin copper rods, which can be extended by sliding.
Battery Charger: AC or DC Adapter, AC Input 220V, DC Output 9V
The receiver has a working indicator light, a battery access port, an indicator for the antenna connector, and a headphone jack.
· The transmission antenna is a red rectangular frame, approximately 6.5 inches x 16 inches in size, forming a single antenna. The antenna terminates in a red and black plug. The transmission antenna is placed on the top of the box.
Turn on the switch to test the battery power. If you want to test the transmitter, bring a small radio tuned to the AM frequency and place it next to the transmitter. Then turn on the transmitter. If the transmitter is working normally, the AM frequency will be disturbed. If you rotate the largest rotating button on the transmitter panel, the indicator lights of the element selector will be lit in turn. When converting between elements, the instrument's tone will also change.
Test the system by placing the transmitter on the ground, insert the transmitting antenna plug into the corresponding socket (marked with output jacks), note: Do not plug or unplug the transmitting antenna when the transmitter is on, as this will cause great harm to the instrument and the operator. Dig a small pit in front of the transmitter, about 35 inches or so, bury the transmitting antenna, bury it to the point where the black line is submerged; set the element selector in the instrument to the element you want to detect, then turn on the transmitter, adjust the horizontal and vertical knobs counterclockwise to the bottom, not always to the right (this also depends on the geological environment where you are); then adjust in the opposite direction to the point where the corresponding indicator light begins to shine, 35 minutes later, at a distance of 25 feet from the transmitter, insert the receiver pole into the receiver, put on the headphones, turn on the receiver, and adjust the volume to half, then to no sound; then walk slowly towards the transmitter, when you hear it emit the same sound as a radio, start testing the transmitter, and pay attention to the distance between the detector and the transmitter; back 5 feet, for example, if you are within 15 feet of the transmitter, then back to 20 feet away; skillfully use the receiver pole, walk around the transmitter, still maintaining a distance of 20 feet from the transmitter; if there is no target you are looking for in this area, the receiver pole will not cross.
You can bury some metal objects to conduct tests, such as a few coins or jewelry, about 50 feet away from the transmitter.
When you approach the line formed between the receiving antenna and the target object, you will hear a frequency in your headphones; when you are at the signal line formed by the antenna and the test object, the sound is the loudest, and the receiving rod is also crossed. (Remember that the signal line is formed between the receiving antenna and the target object, not between the transmitter and the target object.) When you cross this line, the volume will gradually disappear, and the receiving rod will no longer cross. At this time, if you leave 10 feet away, for example, if you are 20 feet away from the transmitter now, then move 10 to 30 feet away, repeat the same steps, and mark the place where the sound is the loudest and the receiving rod is crossed. Start from the transmitter, draw an X-shaped axis line through the two places marked just now, turn off the receiver and transmitter. Wait at least 15 minutes, move the transmitter and transmitting antenna to a new position, and repeat the same steps. Remember to bury part of the transmitting antenna into the ground, and the point where the Y-shaped axis line formed at this time and the previous X-shaped axis line cross is the burial location of the target object.
After you unfold the antenna and insert it into the receiver, you must first practice and find the feeling.
Stretch the receiving pole to about 6 inches.
· holding a receiver pole in one hand
· Keep your hands apart by 12 inches
·Start from the ends of the two receiving poles, with a spacing of 5 inches between them.
Relax
·Walk at a normal pace.
· Do not raise or shake the receiving pole.
5. You must continuously practice until the receiving pole does not sway at will when walking.
Mastering how to use it takes some time, but it's the key to effectively using the instrument. One must persist.
It should be noted that the detection team is a rigorous scientific discovery process, and it is very necessary to be proficient in the use of instruments. At the same time, the detection work is also arduous. Patience combined with luck will lead to great success. The following suggestions can help you use the instruments correctly:
★ Store the instrument and its accessories in a cool and dry place.
★ When using mobile phones, call devices, and other electronic equipment, please do not use this instrument.
★ Do not use the instrument in severe weather such as thunder, lightning, and strong winds.
★ Do not expose the instrument to direct sunlight in hot weather.
★Should avoid as much as possible the instrument into the sand and other dirty things.
Avoid the instrument from being wet.
Prevent the instrument from excessive vibration.
Check the battery level frequently.
★Operate on harder ground or rock surfaces with tools to prevent damage to the antenna.
Mastering practical experience is very helpful for detection.
Do not attempt to open the adjustment instrument; there are no consumable parts that need to be replaced.
Technical parameters:
Maximum Continuous Power: 850 milliamps
Frequency Range: 433 MHz +/- 150 kHz
Internal Memory: EEPROM 16k x 8 Bit
Voltage Supply: 9 - 12 Volts DC
Storage temperature: -40°C to +85°C
Work humidity 0 - 95% without condensation
【Use Additional Suggestions】
Here's how to use the system step by step, and referring to the diagram will help you understand these suggestions.
1. Insert the antenna, which can cover a 360-degree range. Its strongest detection area is within a 60-degree range in front, behind, to the left, and to the right. This area is represented by a dashed line on the map.

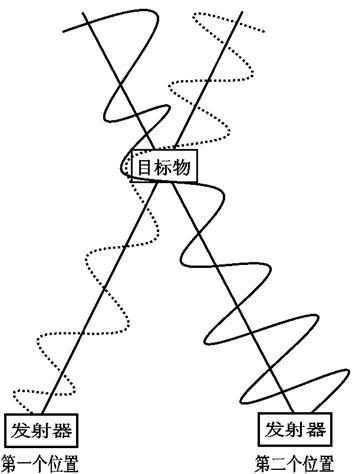
2. It is recommended to use signal tracking methods.
Find the signal line around the transmitting antenna, as shown in the diagram. Walk back and forth in an S-shape to track the signal line. When you pass the signal line each time, the receiving antenna should cross (mark the location of each crossing). When the antenna does not cross, you have deviated from your target. When the object is buried below the transmitting coil, the indicating antenna will point to the target. After you pass the target, the antenna will return to point to the target. (As shown in the diagram).

3. Locate the target object through the cross-over rule.
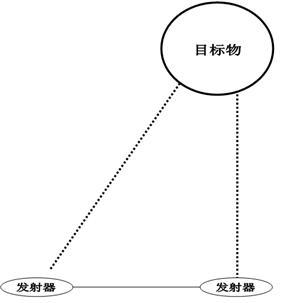
How to use the triangle rule to measure a target in an inaccessible area.
When positioning the target object using a triangle, it is important to pay attention to the first position and the direction indicated. Move left or right from the first position, continuously testing the location of the target object, until the launcher produces a signal line that is exactly 45 degrees to the first signal line. This position is exactly the distance from the target object to the first position. As shown in the figure:
【注意事项】:
★ Each test area must be tested at least twice. When conducting the second test, the launcher must be at least 8 meters away from the location of the first test to avoid missing objects within a few meters.
★Remember that you should not carry any electronic devices or metal objects on your body (especially mobile phones and call machines).
The initial point of the bit line should be an embedded transmitting antenna buried in the ground.
★Change the settings or move the transmitter when you want to, but turn it off first. Wait at least 15 minutes before turning it back on (the purpose of this is to weaken the electromagnetic field of a signal line before confirming the crossline).
★ Do not be in the test area when the launcher is open, such as any metal or other test objects.
In certain circumstances, the signal line formed between the transmitting antenna and the target object may serve as an antenna, and it is necessary to change the detection location orientation and measure at multiple points.
Update time:


TOP


