Search history
Clear allSearch by image
XDrag and drop an image here or upload an image
Max 5MB per image
UploadSign In | Join

Search history
Clear allSearch by image
XDrag and drop an image here or upload an image
Max 5MB per image
UploadSign In | Join
X Email Mobile
Shenzhen Pengyangda Digital Porduct Co. Ltd. 15yr.
Contacts:张许昌 Chat
Mobile:86-13868974929
E-mail:2424561255@qq.com
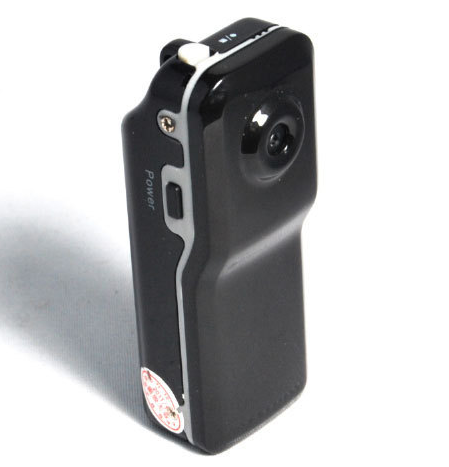
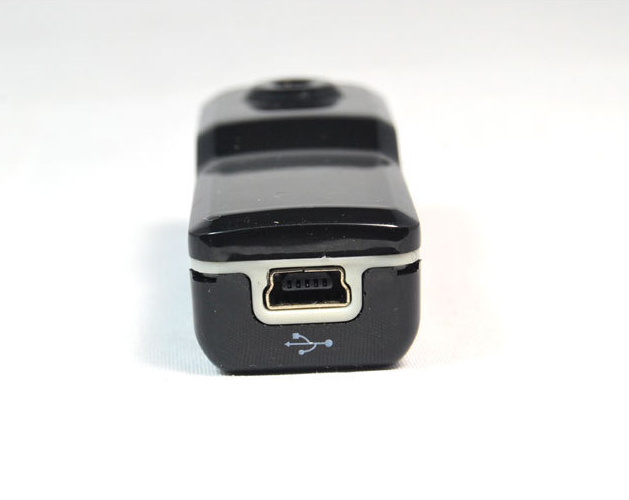
Product Real-life Photos:


Mini DV User Manual:
Product Features
Compact and fashion-forward design, full machine UV spraying for durability and style; equipped with various portable tools
Supports network cameras and has a network chat function.
Supports AVI video format
Under low illumination conditions, the system can output network video at 720x480 resolution at 30 frames per second and 320x240 resolution at 30 frames per second.
Supports standard USB 1.1 and high-speed USB 2.0 interfaces.
The device supports up to 16GB of TF card.
The camera operates for one hour on a fully charged condition.
Section 2. Operating Instructions
Charging:
This machine is equipped with a rechargeable lithium battery. When using this machine for the first time, please charge it first. MINI DV can be charged in the following ways:
1), Connect the computer to charge, use a USB data cable to connect to a computer, and you can charge.
2), Charge the device by using a charger, connect the USB data cable to the charger base, then plug the charger into an electrical outlet to charge the device.
When charging, the green and red lights both light up, both in a stationary state.
Note: When the battery is low, the device will enter a protection state and cannot be turned on. At this time, please charge the device.
Turn on and start recording
Press the Power button, and the green indicator light will turn on, indicating that the device is in a power-on state and will immediately enter a standby mode. Press the Record / Stop button on the top, and the green light will stay on while the red light begins to flash slowly. The device will start recording. The recording resolution is 720x480 pixels, and the frame rate is 30 frames per second. Press the Record / Stop button briefly to stop recording and automatically save the file. After saving, the red light will stay on. If you want to continue recording, please press the Record / Stop button again.
Attention:
Please confirm that the T-flash (Micro SD) card has been inserted.
b. If no card is inserted, the device will automatically turn off after 30 seconds.
The maximum capacity for d.T-flash (Micro SD) is 16GB.
e. Saving the file will take some time,
f. Do not press the operation key continuously when saving.
This will result in the recorded file being unable to be saved smoothly, and the generated file will be incomplete.
Please aim the camera at the subject under adequate lighting conditions.
1. Maintain a distance of more than 50cm from the subject to obtain a correct, natural color, clear scenery, and stable image.
3. Voice-activated camera
Press the Power button, and the blue indicator light will turn on. At this point, press the MODE button to switch to voice-controlled camera mode. The blue light will stay on continuously, and the red light will flash rapidly (indicating the voice-controlled standby state). When the sound at the recording site exceeds 60 decibels, D001 will start to automatically record. At this time, the blue light will stay on continuously, and the red light will flash slowly (indicating that the voice-controlled camera is in operation).
After each voice-activated recording begins, each recording segment is shortest for 2 minutes. If there is no sound after 2 minutes of recording, the recording file will be automatically saved and the system will enter a standby state. If there is sound in the recording site after 2 minutes, the recording will continue for a certain period of time.
4. Time Setting
In the product's attachment DVD, there is a file called the time synchronization file. Please copy this file to the TF card. After connecting the machine to a computer, the machine's time will be directly synchronized with the time displayed on the computer.
Specific usage is as follows:
1. Create a text file named TAG.TXT in the root directory of the card
2. Open the TAG.TXT document, strictly follow the format in the attachment, and write the time to be synchronized.
The specific format is as follows:
[date]
2009/07/22
12:30:30
Each time the system boots, it will perform a self-check and analyze the TAG.TXT document. It will then set the system time based on the time in the document. After setting the time, the system will automatically delete the document!
5. Shut down
In the camera mode or standby mode, press the Power button for 3 seconds, release the button, and wait until the indicator light turns off, indicating that the machine has been turned off.
6. Connect to the computer
In the power-off, standby, or camera mode, you can connect to a computer directly. After connecting to a computer, it can be used as a USB drive. You can freely copy, cut, and delete files.
Insert this device into a USB port on your computer, and after a few seconds, the computer will pop up with a removable disk icon. The red indicator light will stay on, and the green indicator light will flash for a moment before turning on continuously.
Hint:
a. After connecting this machine to a computer, if the computer cannot recognize it, or if the removable disk indicator does not pop up within 30 seconds, please reconnect the machine once.
b. It is recommended to copy or cut the recorded video file to the computer hard drive before playing it. Directly playing the video file stored in the built-in memory of the video recorder may cause playback to be uneven due to the large amount of data and the inability to keep up with the transmission.
7. Computer camera function:
Before using the computer camera for the first time, please install the driver program. The driver program name is SPCA1528_V2220_M...Setup.exe, which is located in the CD disc included with the random, double-click the file, and follow the installation prompts to complete the installation. After installation, an AMCAP icon will be formed on the computer desktop.
In the power-off or power-on state, connect the device to a computer using a USB cable, and it will be in USB drive mode. Press the MODE button briefly, and you can switch to the computer's camera mode. Click the AMCAP icon to use the device as a computer camera.
8. Reset:
When the machine experiences abnormal operation due to illegal operations or other unknown reasons, it is necessary to reset the product.
The specific operation method is: press the reset button (Reset) with a thin rod (toothpick), and you can achieve one reset operation.
10. Notes
Use: Please strictly abide by the relevant laws of the country and do not use this product for any illegal purposes. Any consequences shall be borne by yourself.
| Project | Parameter | |
| Pixel | 2 million CMOS | |
| Perspective |
80° |
|
| Minimum Illumination | 1Lux | |
| Battery Capacity | 260mAh | |
| power consumption | 130mA/3.7V | |
| Storage temperature | -20°C to 80°C | |
| Operating Temperature | -10℃ to 50℃ | |
| Operating Humidity | 15-85% Relative Humidity | |
| Memory Card Type | Micro SD card (TF card) | |
| Memory card capacity | Maximum Support 16GB | |
| Recording function | The video encoding and decoding is performed using Motion JPEG, and the recordings are saved in the AVI file format. | |
| USB port | USB1.1 | |
| Weight | 50g (approximately) | |
| Size | 55x20x18mm (approximately) | |
| Operating System | Windows 98SE/2000/Me/XP/Vista | |
Accessories: Data cable, CD, Silicone case, Back cover, Stand, Strap
Product USP:
>Ultra-compact alloy integrated body design, convenient for easy recording/monitoring in various scenarios;
Voice-activated recording function for easy surveillance recording, longer usage time, and only recording the images you want;
> With PC camera function, enjoy the network life easily;
AVI format video recording, convenient for PC to play directly, easy to upload to video websites;
Low-light capability, 20 million pixel high-definition camera;
High-speed dynamic recording, instant response to light and dark environments;
Video output: 640×480px at 30 frames per second;
The built-in lithium battery can provide continuous use for 2 hours, and the voice-controlled recording can last longer.
Equipped with a 2GB mini SD storage card, supporting a maximum of 8GB expansion card;
Simple operation, integrated light control indicator;
> Mini USB can charge computers and upload and download images; it also has data transmission functions.
> A full-direction backclip that works with a small universal mount to achieve full-angle recording/monitoring functions;
Convenient installation method, suitable for various material carriers and complex installation scenarios.
Update time:
TOP