
Search history
Clear allSearch by image
XDrag and drop an image here or upload an image
Max 5MB per image
UploadSign In | Join
Search history
Clear allSearch by image
XDrag and drop an image here or upload an image
Max 5MB per image
UploadSign In | Join
X Email Mobile
Yiwu Sihui Electronics Firm 14yr.
Contacts Yang Juxian Chat
Mobile 86-13516927842
E-mail yangjuxian18671@163.com
yjx186718


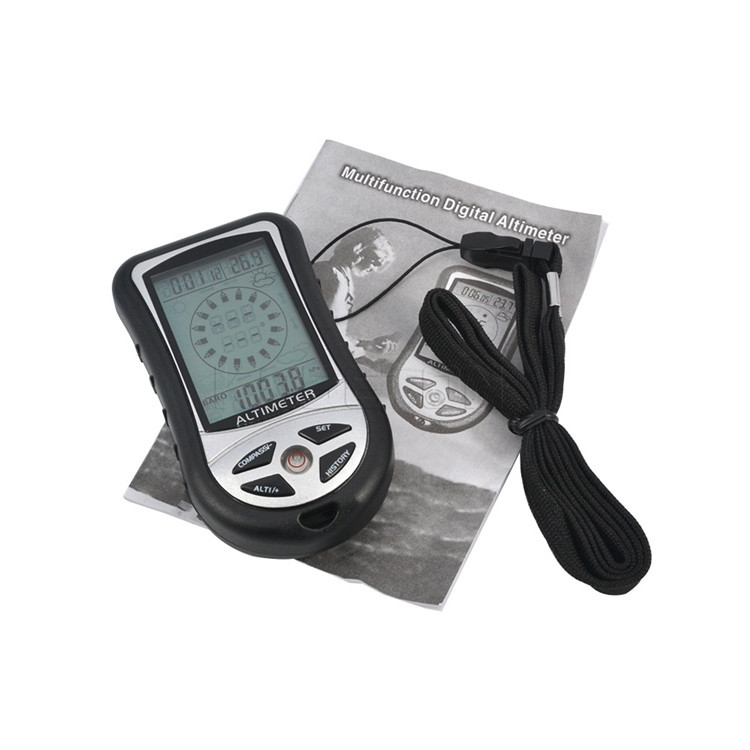
1. Product Description:
The device is an ideal, minimalist equipment for outdoor sports enthusiasts. It provides a wide range of necessary and relatively accurate information, such as an electronic altimeter (weather forecast + altitude meter + compass + barometer + clock) with a blue backlight.
Product Features:
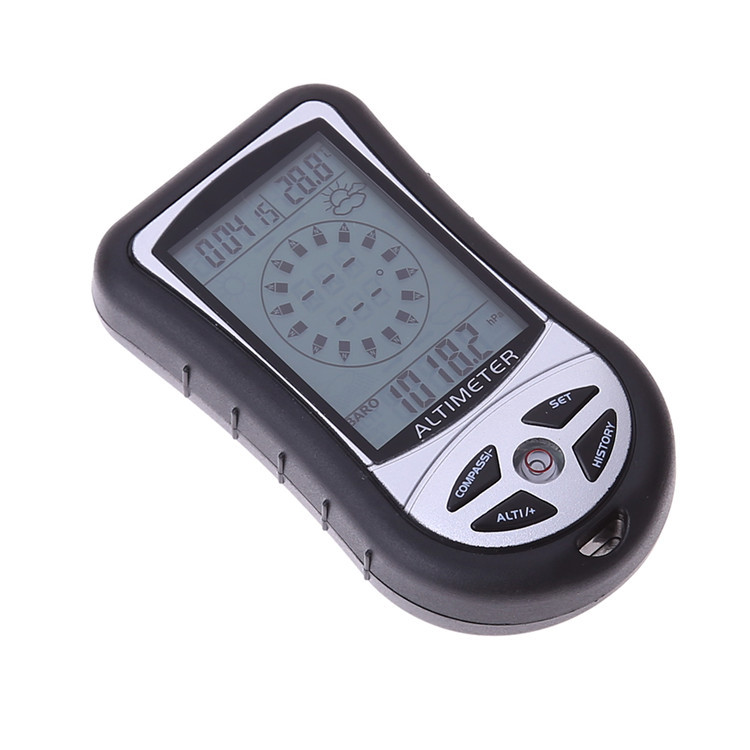
"Altimeter:
·-700 meters to 9000 meters (-2300 to 2950 feet) measurement range (altimeter can be used for initial calibration)
· Resolution: 1 meter or 3 feet
Barometer
·300mbar to 1100mbar measurement range
· Resolution: 0.1 mbar.
Electronic Compass:
8-directional mode display
· External Magnetic Field Calibration
· Accuracy ±3 degrees
· Resolution: 1 degree
Temperature gauge:
· Measurement Range -10℃~+60℃ (Celsius and Fahrenheit units are optional)
0.1 degree resolution
Weather Forecast and Time:
· Forecast the weather conditions 12 to 24 hours later
·4 weather conditions foreshadow: Clear–Partly Cloudy–Cloudy–Rainy
24-hour time format
Electronic backlight:
5-second high-brightness blue LED electronic backlight
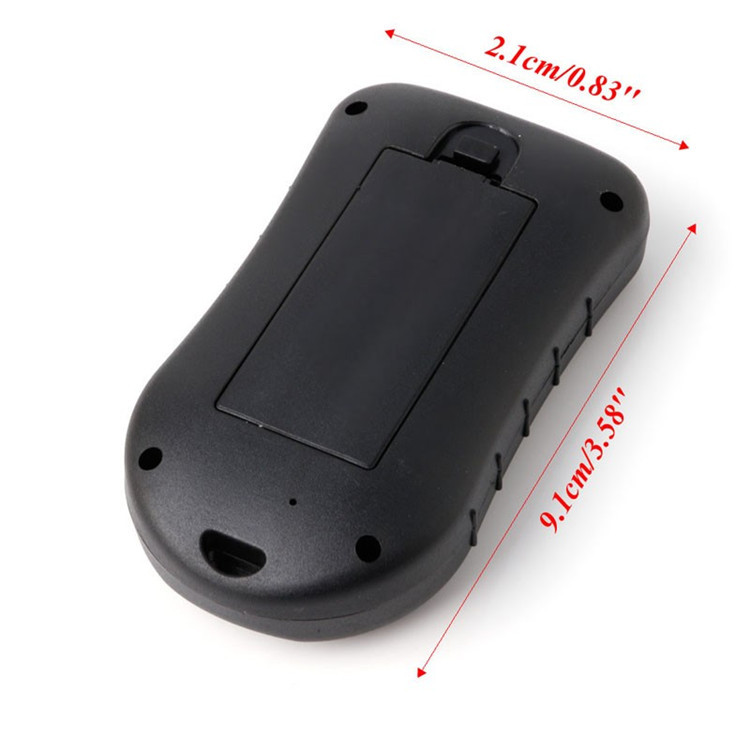
Battery: Uses 2 AAA-7 batteries
Attachment: A neck strap and an English instruction manual.
Notes:
1. Avoid using it in conditions such as rain, moisture, high or low temperatures, etc. (Working temperature: 0°C - 50°C; Storage temperature: -20°C - 70°C).
2. Avoid contact with corrosive substances such as perfume, alcohol, cleaning agents;
3. Avoid using the compass in areas that may affect its normal directional indication:
A、 Near concrete/steel structures such as buildings
B、Very close to the power plant
C、Near household appliances (such as computers, TVs, VCDs, fax machines, loudspeakers, etc.)
D、Nearby a large bridge made of steel or metal
E、在正在行驶的交通工具(汽车、火车、飞机)离很近
F、Near or placed on the surface of the metal plate
Some explanations about an electronic altimeter:
1. This principle is to measure the height difference by sensing the change in atmospheric pressure using a sensor. It requires batteries.
2. At the same location, the barometric pressure can change under different weather conditions (such as clear days and rainy days), or at different times of the day (such as morning and evening). As long as the pressure changes, the displayed height value will also change. For example, if the zero point is placed on the table at noon, the height can be displayed as 16 meters at night. This is because the pressure is lower at night, and the height increases according to the pressure reduction.
3. Can you display the absolute elevation value here? Answer: It is not possible to directly display the absolute elevation value. You must have a place with marked absolute elevation values as a reference. For example, if there is a place marked with an elevation of 20 meters, you can correct it to 20 meters at that height, and then go to the floor where you are, and you can display the absolute elevation value.
4. Is the calibration done a month ago still accurate now? It's likely not, as the reason is mentioned in point 2.
5. I corrected it in Beijing, is it useful for Tibet? There is a high possibility that the error will be quite a bit, and the reason is also the second point.
How to judge if the device is accurate? The simplest way is to reset it at the bottom floor, then start climbing the stairs. As you climb, the height will change. It's best to take the elevator and watch the number jump continuously, although there may be a few seconds of delay sometimes.
7. Make sure to replace the battery with a good pair. Many errors or malfunctions in function are often caused by poor battery performance.
For example: The shopkeeper lives on the 5th floor. When the meter at the first floor is reset, he goes up to the 5th floor, and the display shows a height of 13 meters. By measuring the altitude using GPS, it is found to be 213 meters. After correction, when he reaches the 5th floor, the display shows the altitude as 226 meters.
Parameter Settings
Including the setting of time, calendar settings, temperature unit settings, barometer unit settings, and altitude unit settings.
In normal mode, press and hold the SET button for 2 seconds to enter the setup mode. The settings will blink. You can adjust the settings by pressing the [ALTITUDE/+] or [COMPASS/-] button to add or subtract. Pressing the SET button lightly will switch the settings items in the following order:
12Hr/24Hr -> 时 -> 分 -> 年 -> 月 -> 日 -> F/C -> 气压单位 -> 高度单位 -> 退出。
During the setup process, press the HISTORT key at any time to exit, or if no operation is performed for 10 seconds, it will automatically exit.
Specific setup and operation steps:
1. Long press the [SET] button, and the 24Hr display flashes on the screen in the upper left corner. Press the [ALTITUDE/+] button to switch between 12Hr and 24Hr.
2. Press the [SET] button to enter the time setting mode, where the hour digit will flash. Use the [ALTITUDE/+] or [COMPASS/-] button to set the hour value.
3. Press the [SET] button to flash the minute number, and set the minute value by pressing the [ALTITUDE/+] or [COMPASS/-] button.
4. Press the [SET] button to flash the calendar year number, and set the year value by pressing the [ALTITUDE/+] or [COMPASS/-] button.
5. Press the [SET] button to flash the calendar month number, and press the [ALTITUDE/+] or [COMPASS/-] button to set the month value.
6. Press the [SET] button to flash the calendar date numbers, and then press the [ALTITUDE/+] or [COMPASS/-] button to set the date value.
7. Press the [SET] button to flash the temperature unit in Celsius, and press the [ALTITUDE/+] button to select the temperature unit in Fahrenheit or Celsius.
8. Press the [SET] button to flash the pressure unit HPA, press the [ALTITUDE/+] button to select the pressure unit HPA/inHg/mmHg;
9. Press the [SET] button to flash the height unit M, and press the [ALTITUDE/+] button to convert and select the height unit FEET/M;
The above settings have the [ALTITUDE/+] button for increasing the value, and the [COMPASS/-] button for decreasing the value. Pressing the [SET] button can switch the display of time and calendar.
altimeter
When you first use a barometer, you must set the current height, which is the well-known local altitude, and correct the sea-level pressure. You can obtain the correct altitude value from the topographic map or from the local altitude values announced by the local weather station or the network weather station.
Calibration Method: In the altimeter mode, press the SET and ALTITUDE/+ buttons simultaneously to enter the current altitude setting. Press the "+" button to increase the number, and press the "-" button to decrease the number.
-----Relative Altimeter-----
You can use a relative altitude meter to directly measure the elevation value of ascent or descent from a certain point or the relative elevation value of a mountain or object.
The use of a relative altimeter involves resetting the height measurement to zero at the current time, using the current location as the zero point for height. The height value that rises or falls from the zero point is the relative height value.
The method to reset the altitude to zero is to press and hold the [ALTITUDE/+] button until the screen shows "0m" at the bottom. At this point, when you start moving, the screen will begin to display the relative altitude of your movement. By pressing and holding the [ALTITUDE/+] button again, you can switch back to the actual altitude value.
Barometer
When you first use a barometer, please calibrate the sea-level pressure. Sea-level pressure changes only with pressure changes and not with altitude changes. You can obtain current sea-level pressure from newspapers, local news, weather forecasts, radio or observatory, or online weather stations.
Note: After one year of operation or when replacing the battery, the sea-level pressure setting must be reset.
In barometer mode, press the SET and ALTITUDE/+ buttons simultaneously to enter the current height setting. Press the "+" button to increase the number, and press the "-" button to decrease the number.
Press the [ALTITUDE/+] button to switch between the barometer and the altimeter.
Weather Forecast
Turn on to predict the weather for the next 12 to 24 hours, with an effective range of 30 to 50 kilometers.
Remark:
1. Due to the influence of marine or continental weather phenomena, the weather prediction may be inaccurate, leading to inconvenience. Please refer to the local meteorological station's weather forecast for the latest information.
2. Weather forecasts are for the next 12-24 hours and do not reflect the current situation.
View historical height records, historical barometric pressure records
In barometer mode, lightly pressing the [HISTORY] button will display the historical absolute height. Each time you enter this mode, it always shows the earliest saved record. Press the [ALTITUDE/+] or [COMPASS/-] key to view historical records forward or backward.
In barometer mode, lightly pressing the [HISTORY] button allows you to view historical barometric records. Each time you enter this mode, it always displays the earliest saved record. Pressing the [ALTITUDE/+] or [COMPASS/-] keys will allow you to view historical records forward or backward.
The system can store up to 256 records. Long-pressing the [HISTORY] button allows you to set the time interval for saving history records, which ranges from 1 to 60 minutes.
Energy-saving design
If you do not wish to use any of the functions of this device, simply hold down the [SET] button for about 5 seconds in any state, and the device will enter a dormant state with no display on the full screen. When you next use the device, pressing any button will restore the display to the state before the dormant state.
Backlight
Press any key to turn on the backlight at any state, and press any key to extend the backlight time by 5 seconds when the backlight is on.
Default value
1. Default time: 0:00; Default display in 24-hour format
2. Default date: 2007-1-1, the screen display sequence from left to right is day month year
3. Default temperature unit: Celsius (°C)
4. Default pressure unit: Hpa
5. Default height unit: M
6. Default interval for historical records: 5 minutes
Update time:


TOP


