KX1918 Water Rocket Head Kit (Medium Size)
KX1919
Water Rocket Head Kit (Large)
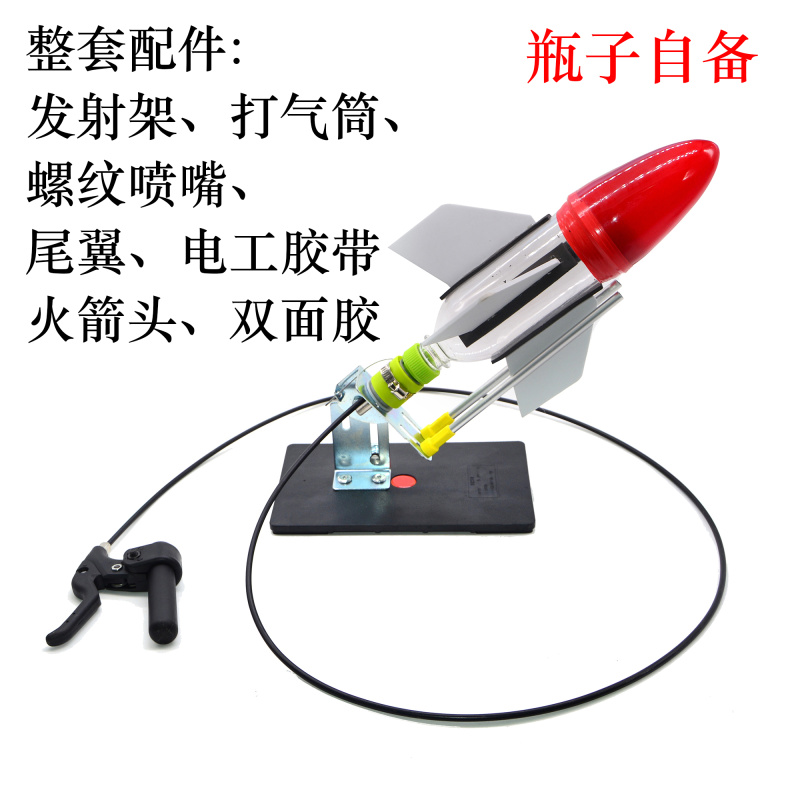
KX1920 -A Water Rocket Kit (Full Set)
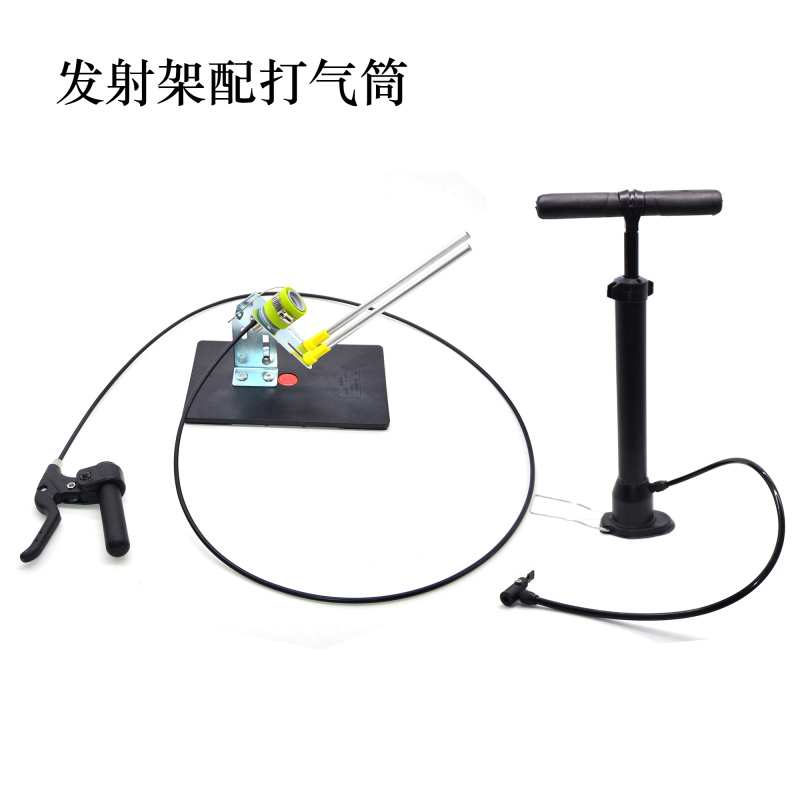
KX1920-B Water Rocket Kit (Launching Stand with Air Pump)
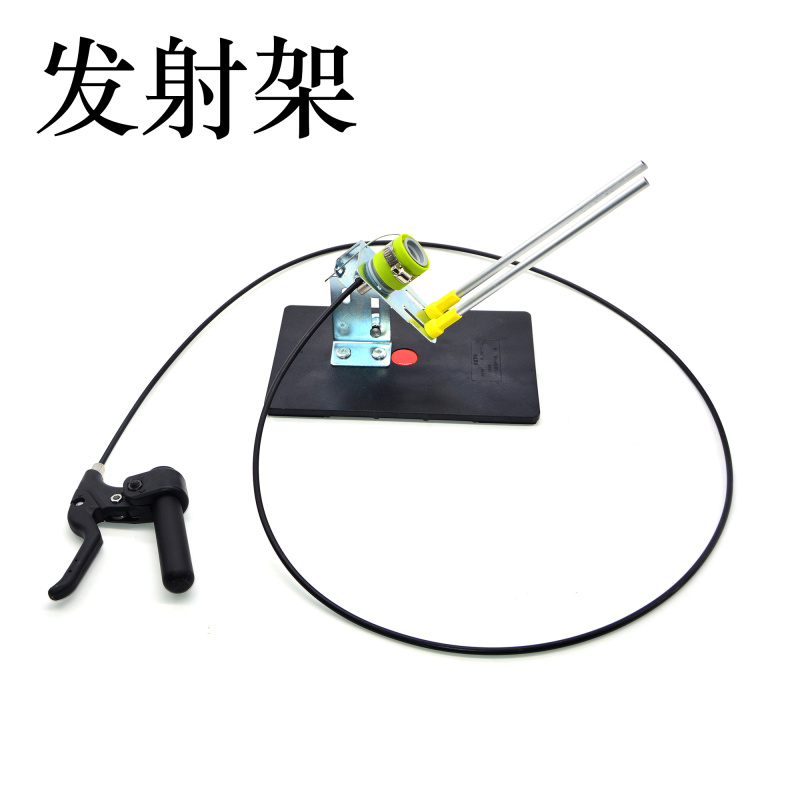
KX1920-C Water Rocket Kit (Launch Frame)
KX1920-D Water Rocket Kit (Air Pump)
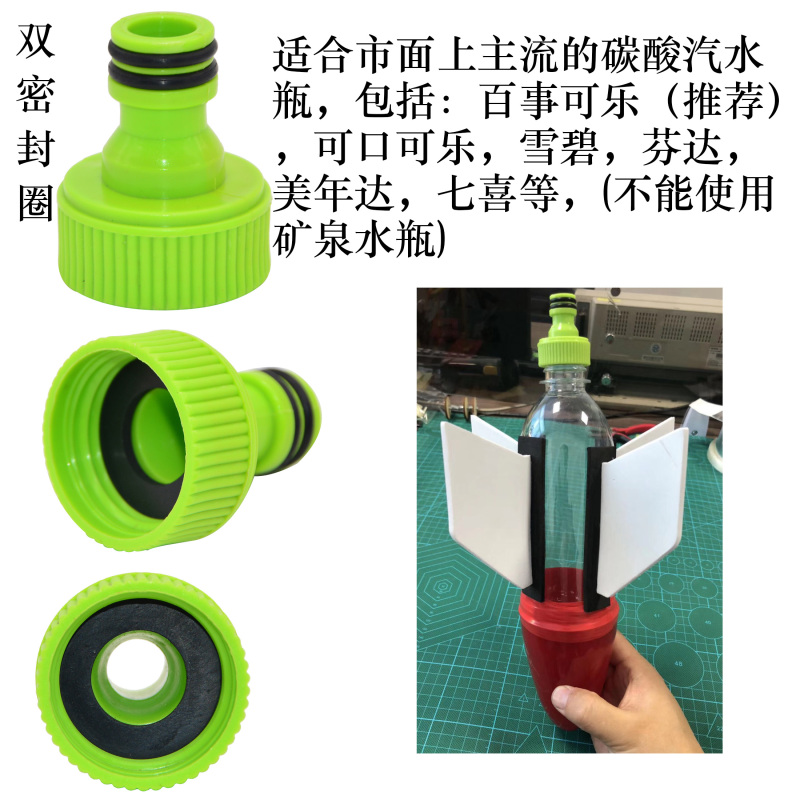
KX1920-KX805 Threaded Nozzle
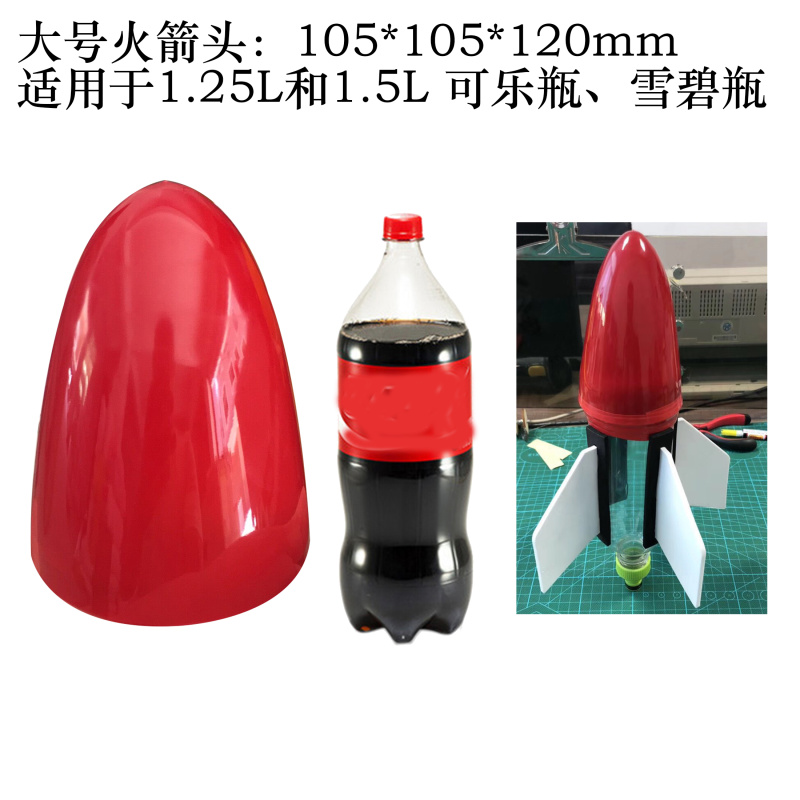
KX1920-PJ8 Rocket Head Large Size
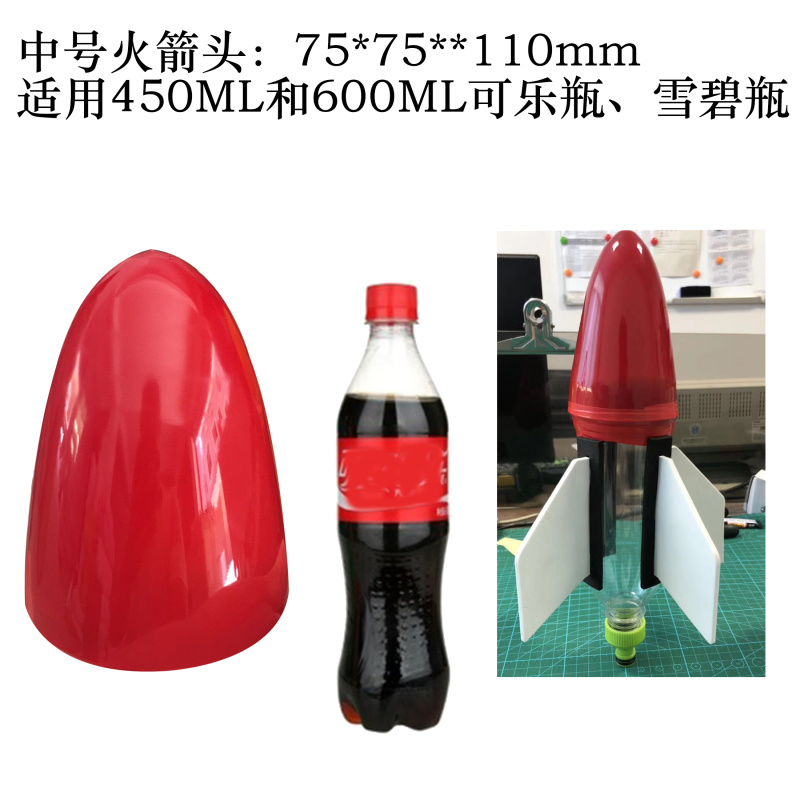
KX1920-PJ9 Rocket Head Medium
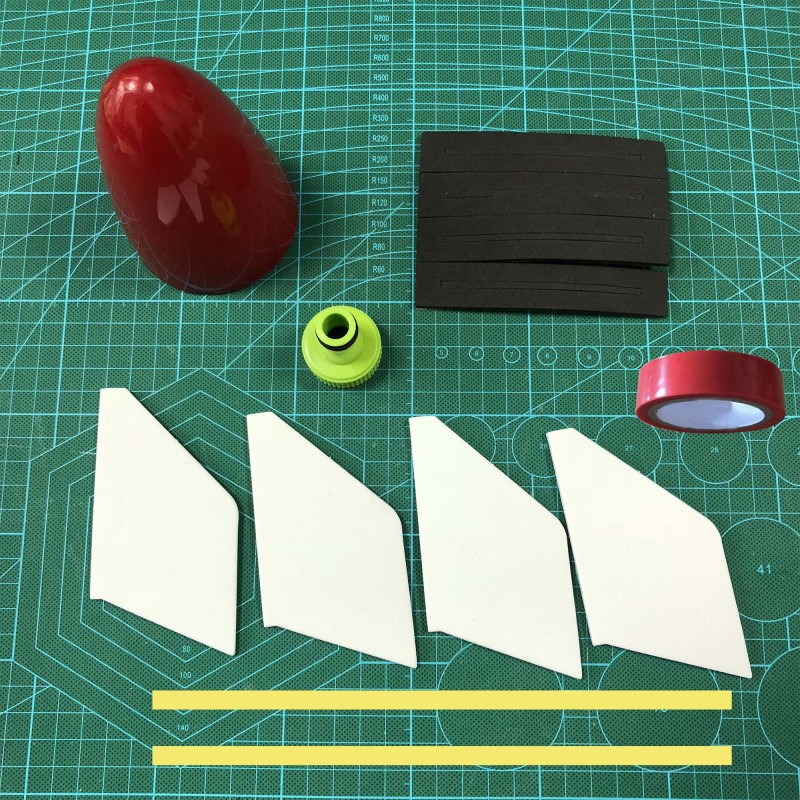
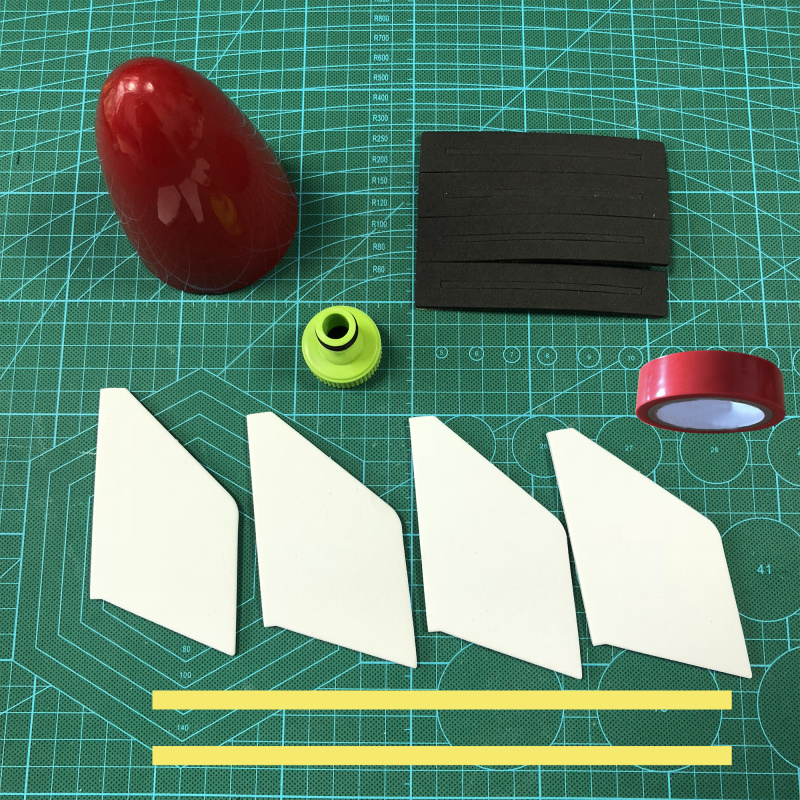
Water Rocket Making Accessories - Protection Head - Suitable for All Sizes of Cola Bottles
Detail Differentiation:
Rocket Head: Specification:
Large Rocket Head: 105*105*120mm Suitable for 1.25L and 1.5L Coca-Cola and Sprite bottles
Medium-sized rocket head: 75*75**110mm Suitable for 450ML and 600ML Coca-Cola bottles, Sprite bottles
Small rocket head: 25*25*67mm, suitable for pipes with a diameter of 2.05mm
1. Streamlined design, reducing flight resistance while enhancing aesthetics.
2. Move the center of gravity of the water rocket forward to maintain the flight's balance and directionality, without needing to add additional weight;
3. Water rockets fall from high altitudes, protecting the body to the greatest extent.
Instructions: Fit the cover onto the bottle, and cut away any excess if necessary to fit the bottle size.
To reduce weight, use electrical tape to wrap and reinforce.
About bottles: Suitable for the mainstream carbonated soft drink bottles on the market, including: Pepsi (recommended), Coca-Cola, Sprite, Fanta, Mirinda, 7-Up, etc., but not for mineral water bottles.


A water rocket is a toy designed to utilize the principles of mass ratio and atmospheric pressure, and it is also one of the famous cases in physics teaching. It can help to cultivate students' interest in physics learning, and the underlying physical principles are an important foundation for understanding mechanics in physics.
Water rockets, also known as air pressure-driven water rockets or water-propelled rockets, are made by using discarded beverage bottles to create the power chamber, the body, the nose, the tail fins, and the parachute.
Rocket Overview
Water rockets, also known as air pressure-driven water rockets or water-propelled rockets, are made from discarded beverage bottles to form the power chamber, body, nose, tail fins, and parachute. They are filled with one-third water and then inflated with air using a pump to a certain pressure before launch. The rocket uses the mass ratio of water to air (the density of water is 771 times that of air) to compress air, which then rapidly ejects water from the nozzle at the rear of the rocket. This creates an opposite reaction, propelling the water rocket upward with rapid acceleration and inertial gliding in the air, similar to a missile with a flight path. Eventually, it reaches a certain altitude and opens its parachute to slowly descend, forming a model rocket.
Water rockets are educational and entertaining, high in technology, and deeply loved by the vast majority of teenagers for their hands-on and brain-stimulating science education. It allows students to visually understand the launch, ascent, and recovery process of missiles and carrier rockets, the flight principles of missiles and airplanes, and their differences. It explains Newton's First, Second, and Third Laws (inertia, conservation of energy, and action and reaction), and introduces basic knowledge in areas such as aerodynamics and flight mechanics. It enables the vast majority of teenagers to understand space technology, to love space technology, and to cultivate, cultivate, and transport outstanding talents for the national space industry. (National competitions have been held multiple times ~ ~).
2 Launch Principle
A bottle with a rubber stopper tightly fitted forms a sealed space. When air is pumped into the sealed container, the air pressure within the container increases. When the pressure exceeds the maximum degree of contact between the bottle mouth and the rubber stopper, the bottle mouth and the rubber stopper detach freely, and the water inside the bottle shoots back, obtaining the reaction force to shoot out. The biggest difference between water rockets and rockets lies in the fact that the propellant medium is changed from high-temperature air to water. Before launching a water rocket, air is pumped to a certain pressure. Since high pressure naturally flows to low pressure, when the nozzle is opened, the air naturally flows to the nozzle. However, because water is in front, the water is pushed out of the rocket by the air, and the rocket also gains forward speed by this.
3 Rocket Construction
Material Preparation
2 to 6 2.25L Coca-Cola bottles, scissors, single-sided blade, cork, ball-type air needle, ballpoint pen refill, stapler, double-sided tape, colored decorative paper, table cloth, and other lightweight and breathable materials.
Production Process
1. The production of the pressure plug: Use a knife to cut off the thicker end of the rubber stopper, with a cutting diameter of 2.3cm, and then pass through the small hole to install the air valve core, the rubber tube, and the screw cap. Then, push the rubber stopper into the bottle opening with force, making sure that the part exposed outside the bottle opening does not exceed about 2mm; use scissors to dig a hole with a diameter of about 12mm in the middle of the beverage bottle cap, so that when the cap is tightened, only the air valve core is exposed outside.
2. The production of the side wings: Cut out four side wings from hard paper. In order to ensure better stability during rocket flight, the side wings must have a higher hardness. If the paper is not hard enough, you can glue two or three pieces together to make them. After cutting the side wings, fold the "sticky claws" alternately back to both sides, and symmetrically paste them on the lower side of the rocket with transparent tape.
3. Remove one of the cola bottles and cut it into thirds with about a 1/3 gap. As shown in Figure 2, leave the neck and the middle section of the bottle. Turn the second cola bottle upside down. As shown in Figure 3, cover the bottom of the second cola bottle with the neck of the first bottle, and then cover the neck of the second bottle with the middle section of the first bottle. After covering, use double-sided tape to securely attach. Then find a hardboard and cut out the balance wings. The number of balance wings should be 4. Too large balance wings will be too heavy, and too small ones will not work for balancing.
4. Make a parachute by folding a square tablecloth along the edges, then folding it again in the middle. Cut off the excess to form a circle and secure the edges with thread.
1. Prepare the materials: 3-4 2.5-liter Jianlibao or Cola bottles, several X-ray films, several 3- and 4-inch soft rubber stoppers used in chemical equipment, a set of bicycle valve cores, scissors and a small knife, transparent tape, double-sided tape, and insulating tape, and a tube of 502 glue.
The second method of production: 1. Wing production. Cut the X-ray film into 28 identical right-angled trapezoidal pieces with a length of 12cm, a height of 6cm, and an angle of approximately 45 degrees between the oblique side and the long base. Cut another 4 pieces of the same specification but with a height of 8cm, with the short base connected and the two sides overlapped (used as the surface of the wing). Adhesive the 7 small trapezoidal pieces tightly to form a thick trapezoid, making it flat and straight, and then tightly wrap a large double-sided trapezoid to cover and adhere it. To make the thick surface of the wing flat, use scissors or a small knife to trim and straighten it, and then seal the thick surface of the wing with insulating glue. Finally, fold the excess parts of the wings outward at 90 degrees. In this way, make three more wings with the remaining X-ray film according to the above method. 2. Body production. Take a Jianlibao bottle (the bottle head curve is quite natural, which is beneficial for reducing air resistance when making the rocket head), cut it horizontally at the 11cm mark from the bottom, and adhere the part with the bottle opening tightly to the bottom of another bottle with insulating glue, and wrap several layers of insulating glue around the junction to make it firm.Gas seal production. Take a 4th size soft rubber stopper, use a hole-opening tool to open a straight hole in the center of the bottom of the rubber stopper slightly smaller than the air valve core sleeve, and then use a small knife to cut off the fine end about 06cm; Put a larger "ring" on the air valve core sleeve (available in hardware stores), and from the fine end of the soft rubber stopper, put the air valve core in place, put on the same "ring", tighten the screw, slightly tight. Finally, grind the gas seal into a cylindrical shape with a grinding stone, so that it can just completely enter the mouth of the cola bottle or slightly tight, and then install the air valve core to use. 4 Rocket head production. Take a 3rd size soft rubber stopper and sharpen it with a knife. 5 Assembly of the wings. Cut a long cylindrical body with two sides connected, which is slightly longer than the length of the wings, from a Jianlibao bottle, and then use transparent adhesive and insulation adhesive to tightly adhere the 4 wings in 4 equal parts. Finally, wrap the insulating adhesive around the bottom of the water rocket to make it level with the mouth of the bottle (this is not necessarily the best position, and it can be adjusted up and down in the flight practice to determine). 6Otherwise. To increase the contact area between the stopper and the bottle mouth to increase the pressure inside the bottle, you can use a knife to sharpen the large end of the stopper slightly and make it rough and round. Since the rocket head has been extended by one section, the rocket head is lighter and unbalanced, and you can appropriately stuff paper inside to achieve balance. To minimize air resistance as much as possible, the cannon head made of soft rubber will be glued well to the bottle mouth of the rocket head with 502 glue. With these methods, a simple water rocket is completed. According to the water rocket we developed, through the improvement of practice, the horizontal flight can reach about 160 meters, and the vertical flight can reach about 4050 meters.
Water rocket launch method: 1. Water volume regulation. The amount of water in a water rocket and the gas-holding space of the rocket have a certain ratio, which cannot be too much or too little. The optimal amount of water is about 1/4 to 2/5 of the rocket's gas-holding space (for a 2.5-liter space, about 600 ml is recommended, and you can experiment several times to find the exact amount).
2. Launch angle. For horizontal flight, the optimal launch angle is between 50 and 55 degrees due to air resistance. This may vary for different water rockets, and can be determined through controlled variable experiments. (Our water rocket's optimal angle is around 53 degrees.) For vertical flight, the angle is 90 degrees.
3. Air plug usage. The principle of using an air plug is to adjust the tightness of the air plug by compressing the soft rubber plug to cause it to expand, with more compression leading to greater volume expansion and tighter air plugs, requiring a greater air pressure to push the air plug out, which means the rocket will gain more power. The specific usage is as follows: First, remove the air valve core from the air plug, insert the air plug into the bottle mouth of the rocket in its original shape, then use a wrench (a tool specifically used for screwing, available at hardware stores) to tighten the screw of the air plug, and finally install the air valve core to inflate the air. (Note: The degree of tightening can be adjusted according to need.)
4. Stable Launch Control. Only the horizontal direction of launch is discussed. A launch pad is needed, which should be equipped with a navigation track. The navigation track should not be too long or too short; it is generally 60cm long (made by combining three large triangular teaching boards and two broom handles, using transparent adhesive to reduce friction between the broom handle and the water rocket). On calm days, aim directly at the target and launch at the best launch angle (the angle between the launch track and the ground). In windy weather, adjust the direction of the launch slightly from the target direction according to the wind strength and direction, and maintain the best launch angle.
5. Precautions. Ensure that the rocket and the track are straight and aligned, as any deviation of 1~2 degrees can affect the stability of the flight and cause it to fly in an "8" shape. When using a pump to inflate the rocket, do so as smoothly as possible, and the pumping frequency should not be too slow. Try to tighten the air seal as much as possible, which can be adjusted by tightening the screw of the air seal. The tighter the air seal is, the greater the pressure inside the bottle will be, and the greater the power of the rocket. Take the first bottle, which is called the A bottle. Draw a line at the 1-1 and 2-2 positions on the top and bottom of the bottle, and the determination method for the two line positions is as follows. 1-1: Select the position where the upper arc of the bottle is close to the curvature of the rocket foam head. 2-2: Select the lower part of the curve where the bottle turns straight, about 0.5cm below.
Cut (or cut) open approximately 0.5cm above the 1-1 line and below the 2-2 line with a craft knife (or scissors).
Trim the material slowly along the marked line with scissors, trying to make it as flat as possible so that it can fit tightly when connecting to the B bottle. Place the rocket foam head over the A bottle, and check from the top whether the foam head is aligned with the center of the bottle. If it is aligned, wrap electrical tape around the junction to secure it.
Remove the cap from the B bottle, then tighten the nozzle onto the opening of the bottle. Connect the A and B bottles. Then roll them on a flat surface or the ground to check if the connection is flat and the rolling is smooth. If so, secure it with electrical tape.
Take the third bottle, which we'll call the C bottle. Mark a line at position 33 and another at position 44 on the bottle. 33: Choose the lower side of the curve at the top of the bottle, about 05cm below. 44: Choose the lower side of the curve at the bottom of the bottle, about 05cm below. From the 33 line, about 05cm below, and from the 44 line, about 05cm below, mark a line.Cut (or cut) open at 5cm with a craft knife (scissors). Fold the thick paperboard in half, and then draw four trapezoidal shapes with a pencil. Then cut along the lines with scissors. Note: The size and shape of the tail fins can be varied to test their impact on flight. Similarly, create a presentation slide with the same size as the thick paperboard trapezoid. Cover the outside of the thick paperboard trapezoid with the presentation slide, first using double-sided tape to adhere the slide and the thick paperboard together, and then using electrical tape to cover the three sides. Adhere the folded part of the bottom with double-sided tape. This step is to attach the four tail fins to the C bottle. The completed picture of the four tail fins. Attach the four tail fins to the C bottle, ensuring they are cross-symmetrical to maintain balance. First, adhere the electrical tape to the sides of the tail fins, paying attention to the length of the electrical tape, which should be higher than the tail fin by about one tape height, and the bottom should be folded into the C bottle to increase the firmness. Then wrap the electrical tape around the top of the tail fins about two times. Connect the C bottle to the B bottle with electrical tape. Note: It is necessary to maintain the straightness of the water rocket body to ensure the accuracy of the flight direction.
Key Points
In the manufacturing process, the nozzle is the most important, and the sealing must be good, otherwise it cannot provide good pressure. The air needle in the cork must also achieve watertight, and it is best to use a hot needle tip to pierce the hole. If there is still a leakage situation, you can add a ballpoint pen core to the air needle, and the tip of the ballpoint pen core extends above the water surface to prevent the rolling and leakage of air bubbles when inflating. The lines of the parachute must be firmly glued, otherwise, if the pressure is too large, it may cause the line to fall off from the parachute body. [1]"
4 World Records
The rocket, which is 830 meters high, was created by several students from the University of Cape Town. Its unusual shape resembles a chopstick when viewed from a distance. After multiple data collection and analysis calculations by a professional team, it was designed, with the exterior made from special materials. It differs significantly from traditional water rocket manufacturing processes and concepts.
5 Research Methods
The relationship between the vertical height of a water rocket and the level of water in the bottle.
The relationship between the vertical height of a water rocket and the level of water in the bottle can be obtained through experiments: It is concluded that when the amount of water is 13, the water rocket flies the highest. The experimental results show that the pressure is proportional to the range. This is because the greater the pressure, the greater the force of spraying water, the greater the impulse of the water rocket, and the water rocket performs reverse thrust motion. When the amount of water is more than 1000ml, the water in the water rocket is not sprayed completely, and it stops accelerating due to the decrease in pressure. Increasing the weight of the water rocket makes it fall early due to the influence of gravity. The larger the mass, the greater the momentum required. When the mass is constant, the greater the speed, the greater the momentum. To increase the speed, the method is to increase the amount of spraying water per unit time. Therefore, only when the pressure in the water rocket is appropriate to the amount of water, can it fly farther and higher. It is found in the experiment that if the amount of water is greater than the upper limit of spraying that can be achieved by a fixed pressure, the water in the water rocket will not be sprayed completely. How can we avoid the situation where the water is not sprayed completely? According to PV"nRT can be used to calculate the maximum amount of water that can be ejected under a certain atmospheric pressure. If the water quantity is not sufficient to be ejected to the maximum amount under a certain atmospheric pressure, it will be ejected earlier. According to theory, we first measure the maximum amount of water that can be filled into the water rocket, and then calculate the maximum amount of water that can be ejected under this atmospheric pressure. Based on these two data, we can fill the water and air to achieve the maximum range of the water rocket (PmaxFmax×Mmax).
How to Improve the Stability of a Water Rocket
During the ascent of a water rocket, it does not rise vertically, often tumbling or side-slipping as it rises. This requires us to improve its stability to ensure it rises vertically. To improve stability, we must consider the effects of air resistance. Firstly, the top of the water rocket should be pointed to reduce air resistance; secondly, the shape of the bottle should be close to a streamliner to facilitate the passage of airflow; and to make it rise vertically, we also need to position it vertically when setting it up. We have used a triangular stand to support the water rocket (not tightly) to ensure it stands vertically.
The impact of the launch trajectory on the range
Fixed water volume 600ml, launch elevation angle 50°. Use the trackless launcher and 70cm launcher to launch water rockets and record the results and launch conditions. Compare the impact of the launch track on the flight distance. The experimental results show that the range of the trackless launcher and the track launcher under the same impulse is almost the same, indicating that the presence or absence of tracks does not affect the range. However, when the impulse is smaller, the trackless launcher is more likely to often deviate from the predetermined direction; while the track launcher has two supports, which makes it easier for the water column to be injected without producing other forces in other directions, so the water rocket can accurately move straight. Therefore, the track launcher is superior to the trackless launcher in accuracy.
The impact of the projectile weight on the launch trajectory
Fixed water volume of 600ml, launch elevation angle of 50°, using a track launcher. The projectile is placed in sequence with fillings, with a mass of 30g, 40g, 50g, and 60g. Compare the impact of the projectile weight on the launch trajectory of the water rocket.
It can be concluded from the experiment that the projectile without a front-filling material is significantly biased towards the rear due to the influence of the tail wing's mass. In this case, since the center of rotation for an object is considered to be its center of gravity, we can treat the center of gravity G as a pivot. Under the condition of only gravity, the projectile can be considered as a horizontal lever with G as the pivot. During flight, the projectile A and the projectile tail B will be subject to the same wind resistance, but due to the different lever arms (AG > AB), the torque generated at point A will be greater than that at point B, resulting in the water rocket's rotation affecting the flight path. Therefore, we must add a front-filling material to move the center of gravity G towards point A, making the lever arm AG equal to the lever arm BG (the midpoint of the water rocket), so that the torques generated at points A and B will be the same, achieving balance. However, if the front-filling material is added too much, the center of gravity will be biased towards the front, causing the lever arm AG to be longer, which will result in an imbalance.
The Impact of Launching Angle
Fix the water volume at 500ml, pre-fill the propellant, and use a track launcher. Use different launch elevations of 35°, 45°, 55°, 65°, and 75° to compare the impact of launch elevation on the distance of the water rocket launch.
The angle of the water rocket's launch is related to the oblique throw, so theoretically, the longest flight distance is achieved when the launch angle is 45°. However, the results of the launch show that the maximum range is achieved when the launch angle is between 45° and 55° (approximately 52°). When the launch angle is too small, the upward force of the water rocket is not large enough to enable significant climb, and the weight of the water rocket is pulled by the earth's gravity, making it easy to fall, resulting in a shorter range. On the other hand, when the angle is too large, the upward force is large, but the forward force is too small, leading to a short range, resulting in the situation of "flying high but not far." Therefore, in the aspect of the launch angle of the water rocket, it must consider the appropriate balance between the upward force and the forward force, the impact of various external factors, and the launch angle.
6 technology highlights
There are many types of water rockets, including single-stage single thrust (single-stage rocket, one nozzle), single-stage multi-thrust (single-stage rocket, multiple nozzles), and multi-stage multi-thrust (multi-stage rocket, multiple nozzles). There are rarely multi-stage single thrust. Since the single-stage multi-thrust is generally "passive separation" of the nozzle (one or several bottles in series), and the body and nozzle are launched at the same time, it is generally not considered a multi-stage water rocket. The multi-stage multi-thrust water rocket uses the "active separation" technology of the nozzle and the body, and the nozzle and the body are launched in succession. The technical fun of making water rockets mainly includes nozzle technology, active separation technology, and recovery technology.
The method of using bicycle inner tubes and valve caps as stoppers is popular in China, but due to the difficulty in controlling the launch time, it cannot perfectly achieve multiple launches. By using a pulley and a rope to pull the launch device's ring down, it achieves good control over the launch time.
In general, single-stage multi-push water rockets involve the thrust difference between the engine and the body. Since it is a 'passive separation' that occurs naturally due to gravity, the thrust of the engine must be greater than that of the body to ensure that both have the maximum thrust when the rocket is launched and are integrated. When the engine's thrust is exhausted, the body naturally separates due to the force of gravity. The main body continues to fly. The advantage of this rocket is that it does not involve complex multi-stage separation technology, and it has a larger thrust, which makes it relatively simple to make. However, it is important to note that the diameter of the nozzle of the body should be smaller than that of the engine nozzle to achieve the thrust difference. Generally, the body uses parachute recovery technology.
Let's talk about the multi-stage multi-propulsion water rocket. This type of water rocket is large in size, and its height can even exceed 200 meters. The highest launch height known to date was achieved by water rocket enthusiasts on October 30, 2010, reaching 864 feet, approximately 263 meters. Although the launch height of this rocket is not very high, it is more challenging due to the "misaligned injection" technology, the "active separation" technology, and the "staged recovery" technology of the body and the propulsion system, making it more favored by water rocket enthusiasts. The active separation technology in foreign countries varies in style, but the basic principle is consistent. By using the gravity when the thrust of the propeller is exhausted and the spring force in the pre-embedded separator, as well as the thrust from the second stage of the rocket when the separation begins, it can quickly achieve the active separation of the first and second stages. When the propeller part enters the descent stage, it opens a parachute, and the second stage continues to rise until the thrust is exhausted and the second stage parachute opens. If there is a third stage, it will be pushed in turn.
Single-stage multi-thrust water rockets and multi-stage multi-thrust water rockets can both be quite large, but distinguishing between them is not difficult. You can tell them apart by looking at their appearance. Single-stage multi-thrust water rockets (which can be called pseudo-second stage) have the body and nozzle of the engine in one plane, as this is the easiest way to achieve simultaneous launch. However, for multi-stage multi-thrust water rockets, the nozzle of the second stage is always connected to the engine, as the second stage does not start working until the launch begins. Therefore, you can tell them apart by looking at the position of the nozzle.
7 Extended Production
1. After becoming familiar with the basic construction of water rockets, you can try to make larger and multi-stage water rockets. Use lighter metals to make them, and provide the air pressure using a pump.
2. The manufacture of a multi-stage rocket:
Tie several water rockets together and provide them with air pressure from a single air inlet. Meanwhile, spray water columns to enhance the flight capabilities of the water rockets.
After exploring, researching, and experimenting for more than half a semester, we have initially completed the development of the water rocket. We have made improvements in many aspects. Through the method of searching for information, we have a profound understanding of the history of rocket development, especially the history of rocket technology development in our country. We know that rockets are essential carriers for modern space exploration. Our country is the birthplace of rocket technology. However, due to the shortage of funds and technical deficiencies, the development of the space industry has progressed slowly. However, with the strength of the comprehensive national strength and cooperation with foreign countries, we have launched many "Long March series" rockets.
2. Split one of the Bottega Veneta bottles into three parts; keep the neck and middle section.
3. For the remaining bottoms and midsections of the bottles, respectively, fit them onto the bottoms and mouths of another BOTTLENECK bottle, remember to apply the adhesive and fix them with insulating tape.
Note: The rocket's body must remain straight.
4. Use thick transparent film or pearl version to make four tail fins, and then evenly distribute and fix them on the fire
The latter half of the water rocket: Apply adhesive and securely fix with tape. Uneven distribution or non-fixation can affect the direction of the rocket's movement.
5. Put on the rocket head and nozzle, ready to take off and soar high!
6、Prepare for launch on the launch pad.


 kx1918 water fire arrow suit (medium)
 kx1919 water fire arrow suit (large size)
 kx1920-b water rocket suit (launcher pump
 kx1920-b water rocket suit (launcher pump
 kx1920-pj8 fire arrow large
 kx1920-pj9 fire arrow medium
 kx1920-pj10 fire arrow small size


